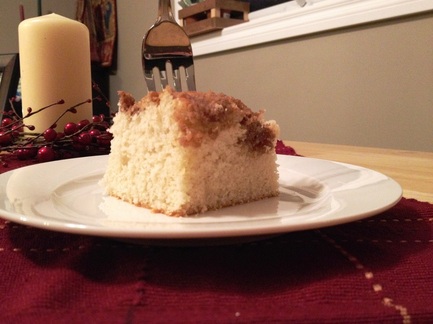
![]() I don't know about your place but at ours, we get coffee-ers. I am not sure if that is a universal rancher term, or just a Williams term, but coffee-er's are your neighbors, friends and family that frequently stop in just to have coffee and chat about the communities happenings. And when you get coffee-ers you need a good treat- and what's better than home-made coffee cake!? This is another Pinterest recipe so click here if you would like to see the original link. RECIPE Cake: 1 egg 1/3 cup melted butter or margarine 1/2 cup milk 1 tsp vanilla 1 1/2 cups flour 3/4 cup granulated sugar 2 1/2 tsp baking powder 1/2 tsp salt Topping: 1/4 cup flour 1/4 cup unsalted butter 1/2 cup light brown sugar 1 tsp ground cinnamon Preheat your oven to 375 degrees Fahrenheit. Combine the egg, milk, vanilla, butter and sugar with your stand mixer. In a separate bowl combine your flour, baking powder and salt. Slowly add the dry ingredient mixture to the wet ingredients in the mixer. Blend well. Taste the dough- this is important as the dough is oh so very tasty! To make the topping, in a separate bowl, combine the flour, butter, brown sugar and cinnamon. Use a pastry blender to create a crumbly mixture. Grease a 9 x 9 glass baking dish. Add the dough. Sprinkle the topping on top of the dough. Put the dish into the oven for 25-30 minutes or until an inserted tooth pick comes out clean. My coffee cake took about 35 minutes so don't be afraid to leave it a little longer. Cool, slice & enjoy around the table with your coffee-ers!
0 Comments
![]() It was appetizer night at our house last Saturday and I found this delightful recipe on Pinterest (click here for the link). Now of course Clayton had absolutely no idea what Focacchia was and so I added cheese to half and called it cheese bread- and he loved it! While it is yummy by itself we tried it with Bruschetta, dill cheese ball and oil & vinegar. All were great options for this tasty treat! RECIPE 1 3/4 cups warm water 2 1/4 tsp active dry yeast 1 TBSP warmed honey 5-6 cups all purpose flour (I used 5) 1 TBSP salt 1 cup olive oil, plus a little more ( I opted for home grown canola oil!) Coarse sea salt Black pepper Fresh rosemary, chopped (optional) This recipe requires two separate rise periods so the recipe can take up to 3 hours to complete. But don't worry, it's easy! Mix together your warm water, yeast and melted honey in a bowl. Let this mixture sit for about 15 minutes until there is a thick bubbly yeast on the surface. Add this mixture to your stand mixer with 1/2 cup canola oil, slowly adding in 5 cups of flour and the tablespoon of salt. Using your dough hook, mix the dough on a low speed for about 5 minutes until the dough looks uniform. You may need to add the additional cup of flour. You want your dough to be a little rubbery to the touch but sticky if it is held too long. You will now move the dough into a bowl with its sides covered in oil. Cover the bowl with a clean tea towel and let the dough rise for about an hour (you want the dough to double in size). After the first rise, take a cookie sheet (with sides) and add a 1/2 cup of oil to it, spreading the oil evenly over the sheet. You will then stretch and press the dough over the entire cookie sheet (covered in oil). Once you have the dough spread, turn it over to oil the opposite side of the dough. Now you can cover the dough in plastic wrap and leave for another rising period (about another hour). About 45 minutes into the second rise, preheat the oven to 425 degrees. After the second rising is complete (I actually left mine to rise for several hours as I got busy doing things around the house) flip the dough one more time to ensure the oil is spread evenly on both sides. This can be quite messy and will seem like a lot of oil but trust me, it's worth it! Use your finger tips to make dimples in the dough so the oil will pool (it also gives that classic foccachia look). You can now add your toppings. I did one half of sea salt & pepper and the other half with cheddar cheese and garlic salt. Bake the focaccia for 25-30 minutes, or until the top is golden brown. When it’s ready to come out, let it cool a few minutes before slicing and serving. |
A Blog About Our Life, Love & Lessons Learned on the Ranch
Categories
All
Latest Posts
Archives
August 2019
|